
Gecko Deck
A Free Control Deck for StreamersGecko Deck is like a Stream Deck, except that there's nothing to buy (no hardware that you don't already have, and the software is free), and you run it on a tablet, phone, or another computer.
What It Is/Offers
- A way to trigger hotkeys on your computer from another device
- For example, the hotkeys you've specified in Streamlabs OBS to switch scenes, hide and show widgets, mute or unmute your mic, etc.
- Control it from a web browser on any tablet, smartphone, or computer -- no client app required
- Create an unlimited number of fully customizable button sets -- you control:
- grid size
- images: use any image on a button
- text label
- Use buttons to navigate between button sets
- Trigger any combination of Control, Alt, Shift, and another key
- Trigger sequences of keypresses
- Set the delay time between keypresses
- Free
- Powered by Node.js and nut.js, both of which are free
What It Does NOT Offer
- A user-friendly control panel -- configuration is done by editing JSON and CSS code
- An extensive image set -- you'll need to supply most of the images for your buttons -- either create your own or find them elsewhere
- API integrations -- it only triggers keypresses, so you'll have to configure your streaming tools to respond to hotkeys
- A simple installation package -- you'll need to install Node.js and nut.js on your computer
- Guaranteed tech support -- there's a channel in our Discord for questions, but the level of support I guarantee matches the purchase price: zippo
Server Installation
All of the following is to be done on the computer you want to control -- eg. the computer that is running Streamlabs OBS.
- Download Gecko Deck.
- Unzip it wherever you want it to be.
- Install Node.js.
- Install nut.js in your Gecko Deck folder.
- Recommended: make a shortcut to launch it. For example, on Windows, if you installed Gecko Deck in a folder named "geckodeck" inside your user folder, and Node.js is in your Program Files folder, you would make a shortcut with "Target" set to C:\Program Files\nodejs\node.exe" geckodeck-server.js and "Start in" set to C:\Users\your-username\geckodeck. I suggest setting "Run" to "Minimized". (To create a shortcut, right click on the place where you want to create it and select New > Shortcut.)
Launching and Exiting
After you've installed and configured Gecko Deck (see below) and created a shortcut to it, you can launch it by double clicking the shortcut. You exit it by closing the window that it opens in, which will, if you set it to run minimized, be in your Task Bar. (Its window will be empty -- this is normal.)
If you launch it by typing the command to launch on the command line, you can exit by typing Ctrl-C (possibly twice -- not sure why it doesn't always exit after the first time.)
Client Setup
Gecko Deck is controlled by accessing it in a web browser. To do this, you'll need to know the IP address of the computer it's running on. (If you can set a static IP address for your computer, that will make your life easier, because you won't have to create a new shortcut on your tablet every time your IP address changes to run Gecko Deck full screen.)
By default, Gecko Deck runs on port 8080. This can be changed by editing the port number at the top of geckodeck-server.js.
If, for example, your IP address is 192.168.1.10 and you're running Gecko Deck on the default port, you will access it by loading http://192.168.1.10:8080/ in a web browser on another device on your network.
In order to run Gecko Deck full screen on Android with no address bar or other widgets clutting it up, you'll need to create a home screen shortcut for it and launch it using that shortcut. To do that:
- Load it in your browser.
- Tap the 3 vertical dots in the upper right corner of your browser.
- Tap "Add to Home screen".
- Close the browser window.
- Launch Gecko Deck using the home screen shortcut you just created.
Creating Button Sets
Here are the basic steps needed to set up your button sets:
- Find the images you want to use on your buttons and copy them into Gecko Deck's "img" folder.
- Create a file in your Gecko Deck "layout" folder for each button set you wish to create. The file must contain nothing but valid JSON code (more details below), with the exception that you can include comments by typing "//" followed by your comment. Everything on the line following "//" will be ignored by Gecko Deck.
- For each button set that you wish to be able to navigate directly to from your Gecko Deck home screen,
add a line like the following to the "buttons" section of home.json (in the layout folder,)
replacing the example contents.
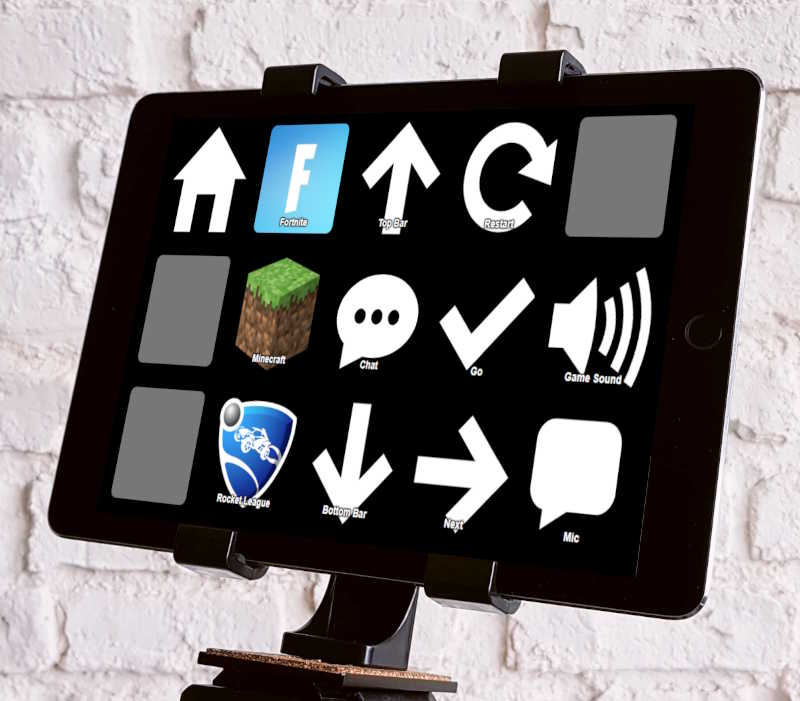
{"layout":"fortnite.json","img":"folder.png","label":"Fortnite"}- If you enter multiple button sets, be sure to separate the lines with commas.
- As you might imagine, in this example, "fortnite.json" is the name of the button set file created in step 2, "folder.png" is the image to be displayed on the button, and "Fortnite" is the text label to be displayed on the button.
- To create a button set file, you might start by copying demo.json in the layout folder. Then, replace the contents of the "buttons" section with the definitions for each of your buttons (see below).
- Depending on your desired grid size, you may wish to change the name of the stylesheet on the "css" line at the top of the file. To use a grid size we haven't defined, or to change the color scheme or other details, you can make your own stylesheets in the "css" folder.
Button Definitions
As you can see in home.json and demo.json, a button that is used to switch button sets must contain something like "layout":"layout-filename.json".
It may also specify an image (eg. "img":"image-filename.png") and/or a label (eg. "label":"label text").
Any images directly inside of Gecko Deck's "img" folder are specified without a path. Images inside of subfolders will need their paths specified too, using a colon as the folder separator. For example, as you'll see in demo.json, "public-domain-icons-master:building-home-house-dashboard-index.svg". (The folder name "public-domain-icons-master" comes from the place that I got the icons in the folder from. I left their filenames the same...even though they're sometimes painfully long...but changed them all to white. You can see all of the images in that folder on one page by opening the index.html file inside the folder in your web browser. Most of them are probably useless for this purpose, but I left them in anyway in case someone wants them.)
To leave a square on your grid blank, simply enter ,{} (ie. an empty button -- the comma before it is to separate it from the previous button).
To specify a button that triggers keypresses, enter an image and/or label, and then include an "actions" section such as this:
"actions":[ // type n in Interact window

		{"c":"kdu","k":["LeftAlt","Tab"]}

		,{"c":"w"}

		,{"c":"t","k":"N"}

		,{"c":"w"}

		,{"c":"kdu","k":["LeftAlt","Tab"]}

		]
The actions section above specifies 5 things that happen, in order, when the button is pressed:
- Press and release Alt-Tab (technically, using the left Alt key, but RightAlt could have been used.)
- Wait 25 milliseconds (the default wait time.)
- Type the letter "N".
- Wait 25 milliseconds
- Press and release Alt-Tab
This is a sequence I use to switch from the game I'm playing to the previously opened window (the Interact window in Streamlabs OBS for my Conversation Starters widget), press "N" to tell the widget to display the next question, and switch back to my game.
"// type n in Interact window" is a comment that I entered to remind me what this sequence of actions is intended to do.
Command Details:
- "c" stands for "command.
Valid values are:
- "kd": key down
- "ku": key up
- "kdu": key down, up (with a delay in between)
- "t": type some text (similar to a series of "kdu" events, but depending on the window that you're sending keypresses to, one or the other may sometimes work where the other doesn't)
- "w": wait for a specified number of milliseconds (default: 25)
- "skd": set key delay (the default delay time between keypresses, and for the "w" command)
- "k" stands for "keys".
It is used to specify the key or keys to be pressed or released by "kd", "ku" and "kdu".
- For a single key, it may be a string instead of an array of strings.
- To press or release multiple keys simultaneously, it must be an array.
- The keys must be specified using the names in the "keymap" at the bottom of geckodeck-server.js. For most purposes, you'll probably only need "LeftControl", "LeftAlt", "LeftShift", and uppercase letters. See the file if you need numbers or other keys.
"k":"Type this text." - To use a non-default wait time for a single command, or to set a new default wait time using the "skd" command, specify the number of millseconds like
"t":100
If all of the above made sense to you, you're probably the kind of person who would like using Gecko Deck. If it was incomprehensible gobbledygook to you, you may want to find something a little easier to set up.